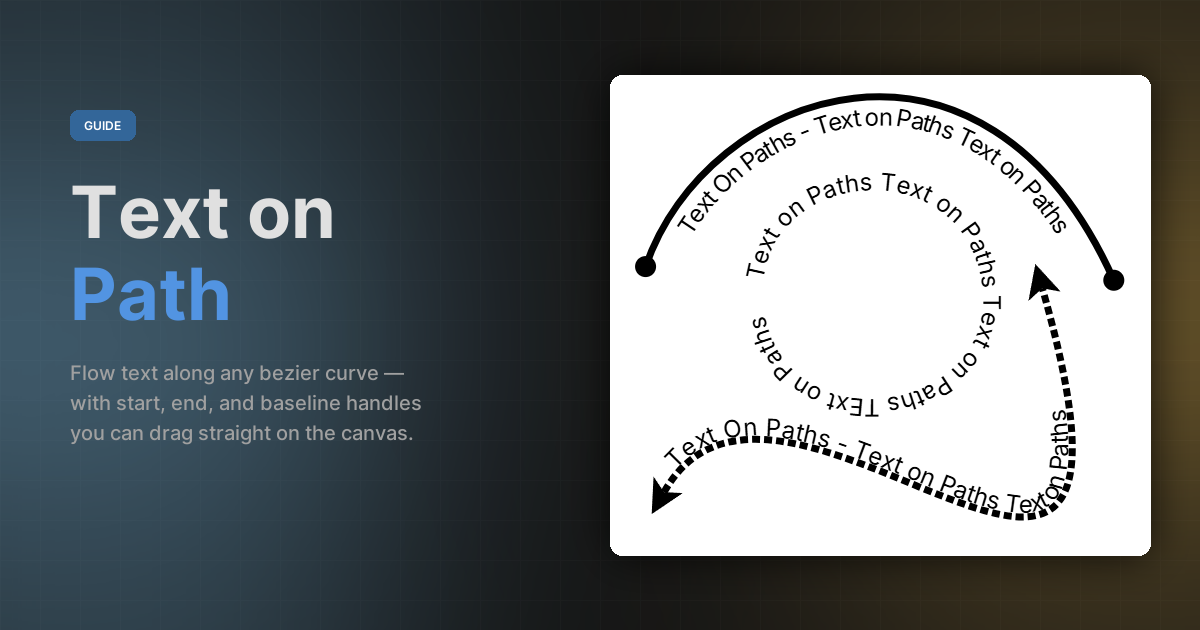
Brushee can flow text along any bezier path. The text rides the centerline by default, banks with each curve, and stays editable — fonts, alignment, even the path's own nodes — without ever flattening into static glyphs.
Attaching text to a path
There are four ways to get text onto a path. Pick whichever fits the moment:
1. Draw a path and start typing
Click the small chevron below the Pen tool and pick Text on Path from the flyout. Draw the curve as you would with the Pen — click for corner nodes, click-drag for bezier handles, double-click to finish. The instant the path closes, the inline editor opens and your keystrokes go straight onto the curve.
2. Add text to an existing path
Right-click a selected path and pick Add Text to Path. The path inherits a default Text placeholder and the editor opens. The first keystroke replaces the placeholder, so you can just start typing.
3. Drag a text object onto a path
Select a regular text object with the Pointer and start dragging it. When the cursor sits within ~20 px of a path stroke and stays there for 250 ms, the path highlights and a live preview of the text shows exactly where it'll land along the curve. Move the cursor along the path to scrub the anchor — the start of the text follows wherever the cursor goes. Release to commit; the original text object is consumed and the path takes on its font, fill, and content.
4. Pop text back off
Right-click a text-path and pick Remove Text from Path. The text becomes a standalone text box, positioned at the start handle and sized to the distance between the start and end handles, so the wrap roughly matches what was visible on the curve.
On-canvas handles
Once a path has text, three yellow handles appear on the curve when the path is selected:
- Filled triangle — the start. Slide it along the path to push where the text begins.
- Hollow triangle — the end. Slide it to set where the text stops. The text won't render past this point.
- Diamond — the baseline. Drag perpendicular to the curve to lift the text off the centerline. A dashed line connects the diamond to its anchor so you can see how far you've offset.
The triangle apex always points toward the side the text sits on. If you raise the baseline above the curve, both triangles flip up; if you push it below, they flip down. Same goes for Flip orientation in the Properties panel.
By default new text-paths start with the start handle at 5% and the end at 95% — handles inset just enough to be immediately grabbable without crowding the path's endpoints.
In-place editing
Double-click the text — or the path — to enter editing mode. Unlike older text editors that pop a rectangular textarea over the canvas, Brushee edits in place: the actual rendered glyphs are what you're editing, and a blinking caret shows where the next keystroke will land. For text-on-path the caret banks perpendicular to the local tangent so it stays oriented to the text, even on tight curves.
Selection
- Drag across glyphs to select a range. The selection highlights rotate with each glyph for path-text and span entire lines for normal text — staying visible even while the caret blinks.
- Shift + click anywhere on the editing object to extend the selection from the existing anchor.
- Shift + arrow / Shift + Home / End to extend with the keyboard. Up / Down work for normal multi-line text.
- Ctrl / ⌘ + A selects everything.
- Typing replaces the selection; Backspace / Delete with a selection deletes the range.
Click anywhere on the text
Hit-detection includes the rendered glyphs themselves, not just the path's bounding box. So you can click on visible characters even when they extend well past the path's bbox — useful when the baseline pushes the text away from the path or when the path's stroke is thin.
While editing, clicks on properties-panel inputs don't commit the edit. You can adjust the font size, change alignment, or pick a fill colour and continue typing — only clicks on the canvas outside the text commit and deselect.
Properties
When a text-path is selected, two new sections appear in the Properties panel.
Text
The familiar font / size / weight / alignment row, plus B / I / U toggles, line height, letter spacing, and word spacing. All bound to the text-on-path payload — independent of the path's own fill / stroke.
Text on Path
- Reverse direction — walks the text end → start instead of start → end. Each glyph is rotated 180° so it still reads upright.
- Flip orientation — mirrors the text to the opposite side of the path. Combine with reverse for upside-down banner-style readings.
- Baseline — slider and numeric input mirroring the on-canvas diamond handle.
- Hide Path — suppresses the path's own fill and stroke. The text stays visible but the curve becomes invisible to viewers. While you're editing it still renders as a dashed reference line so you can see what you're working with.
Path nodes still edit normally
Switch to the Subselect tool (A) and the path nodes
appear alongside the text-on-path handles. Drag a node circle to
reshape the curve and the text re-flows in real time. Drag a triangle
to retrim the start / end. The two systems share the canvas — the tool
picks whichever handle the cursor lands on.
You can still insert nodes the usual way (hover the path, double-click the green preview), and switching node types between Corner / Bezier / Spline / Arc all rebuild the curve while the text follows along.
Filters and effects
Drop shadow, outer glow, inner shadow, inner glow, and inner bevel all apply to the path and its text together as a single object. The filter offscreen is sized to the union of the path bbox and the laid- out glyphs, so even text pushed far off the path with a tall baseline still picks up the filter.
When Hide Path is on, only the text contributes to the silhouette — the invisible path no longer adds a shadow or glow trail along the curve. This is the standard way to make floating curved text with a soft drop shadow: hide the path, add a drop shadow, done.
Tips
- Bend a label around a circle — draw an ellipse, convert to path, Add Text to Path, type. Drag the start handle to rotate where the text starts on the ring.
- Lift letters off a baseline — set a positive baseline and the text floats above the curve; negative pushes it below. The baseline diamond reflects the sign automatically.
- Inverted bottom labels — if a label hugs the inside of a closed curve and reads upside down, toggle Flip orientation. The text now sits on the inside with each glyph rotated 180°.
- Move the path, the text follows — translation, resize, scale, and rotation all invalidate the cached arc-length samples so the text re-flows along the new geometry. The selection frame, handles, and filters expand to wrap the glyphs too.